2012-11-04

Digiscoping with the Swarovski ATM 80 and DCB Camera Adapter


After testing a tube-type digital camera adapter and a rail-type universal adapter, I decided to test the digital camera base from Swarovski. This is also a rail-type universal adapter, but it has the added advantage that it can easily flip out of place on a hinge for viewing purposes. This saves loads of time since there's no screwing or readjusting needed. You just flip a lever to release the adapter and clamp it in place.

As mentioned in my last post, this adapter didn't fit my current (13-year-old) scope, so I asked Swarovski Austria if they would lend me a digiscoping setup for testing and blogging purposes, and they graciously obliged. Here's the equipment I tested:
  • Swarovski ATM 80 HD spotting scope body
  • 25-50x W eyepiece
  • DCB-A digital camera base
  • CT 101 carbon tripod
  • DH 101 tripod head
  • Canon PowerShot A590 compact digital camera
The careful reader will notice that I switched cameras from a Nikon CoolPix AW100. I had bought the Nikon expressly for digiscoping purposes, but it turned out to be a less than perfect choice, at least for me, because I find it relatively difficult to focus the thing.


Both cameras have a 4x zoom, however, so for the purposes of comparing digiscoping camera adapters, this should not make much difference.

Unpacking the Boxes:

ATM 80 HD spotting scope body
25-50x W eyepiece
DCB-A digital camera base
CT 101 carbon tripod
DH 101 tripod head

The first thing I noticed was that one of the two clips on the lens cap got stuck and is difficult to slide into place when replacing the lens cap. The clips on my old lens cap are cast in one piece with the lens cap, meaning there is less technology for something to go wrong with.

Similarly the soft rubber cap on the eyepiece is very loose and easily falls off the eyepiece. The hard plastic cap on the old eyepiece screws on and therefore is almost impossible to fall off. In addition the cord holding the new eyepiece cap to the eyepiece must be detached when using the DCB and is easy to lose.

The new scope has a nifty new sighting aid, but alas, this also must be removed when using the DCB.

The DCB included a balance rail, but as delivered it couldn't be mounted to the tripod head. The little instruction slip was very minimalist with only pictographs and no text so as to cater to the international crowd, but I couldn't figure out how to make it fit the tripod head. Googling the problem didn't help either. In fact, the few websites I found mentioned flat out that the this balance rail (666-0253RM) doesn't fit this tripod head (DH 101). So I wrote Dale Forbes, Swarovski product manager, on Facebook. He said, "you just need to use an imbuss/ hex key to loosen the foot of the rail, and then re-fit it on the other side of the balance bar. It will then slot straight in to the DH101." That did the trick!

I have found that the balance rail is necessary. Otherwise the scope is too heavy on the end where the camera is and tends to tip down.

The tripod has a spirit level in it, but I don't see much use for that in the field. The maneuvering arm of the tripod head apparently isn't meant to be adjusted as often as I was used to with my old setup. Now you need to unscrew a screw with a coin to loosen it instead of turning a screw with your fingers. In addition the rod is no longer round (like a dowel) but rather hexagonal, so that you have to remove the whole thing after loosening it, then insert it again before tightening it. This hasn't turned out to be as much of a problem as I anticipated. Now, when traveling by foot, car, bus, etc., I just don't loosen it any more. If I'm putting it in a suitcase I remove the whole tripod head from the tripod.

Everything else about the tripod head is better than before. There are no longer hand screws to turn when adjusting the tripod head in the two axes, but rather all-or-nothing levers that work just fine (as long as you use the balance rail when a camera is attached).

Inserting the scope's foot into the tripod's shoe and removing it again are much easier than with the old system. There's no additional adapter shoe to add instability. The scope's foot itself (or the balance rail's foot when using one) fits directly into tripod head's shoe. I had problems with this setup loosening all the time on the old system, not so on the new system. The scope's shoe also fits very snugly into the balance rail and is adjusted with a screw that is loosened with a coin. Usually you do this only once.

The tripod itself has pretty much all the same features as my previous tripod and more. The only thing missing are the metal points at the end. These were built into the previous tripod and were hidden out of place by turning the rubber feet. Now you need to order the metal points separately and replace the standard plastic tips, I think. However, I didn't find a need for them in several habitats from fine sandy beaches to rocky mountaintops and everything in between.

The new tripod includes a hook on the bottom of the center rod to hang a weight on (e.g. your backpack) for additional stabilization in windy conditions. I haven't had a need for it yet, but it's good to know it's there.

I chose the CT 101 tripod rather than the CT Travel, even though I fly fairly often, since I thought it might be more stable because the legs have only three sections each instead of four, at the same total height. As you can see below, the tripod and tripod head fit in my suitcase just fine. If it still doesn't fit you can remove the tripod head.


When extending the tripod legs on my old system, I would routinely pull out both sections of all three legs. Then the scope was at perfect viewing height for me, but a little too high for photographing, since the camera setup adds length to the scope and I use the angled version of the scope rather than the straight version. When extending the new tripod to its full length, it's much too high for me, even in viewing mode, unless I'm looking high up in trees or mountains. So I usually just extend only the bottom sections of the legs and bend myself over. This works well with the angled scope, especially with the camera setup attached. Added advantages are increased stability and the ability to share your scope with shorter people and children without readjusting everything and searching for the subject again.

In the photo above you can also see the green bag containing the DCB and the hex key (Allen wrench) for adjusting its height. As with any camera adapter system you will want to do all adjusting and fiddling before you leave for your (first) birding tour. The advantage with this system is that the camera is attached with its tripod screw hole to a bracket that can easily be removed from the DCB with a simple lever if you want to use the camera for other purposes than digiscoping. It is then quickly re-attached. I usually have a second compact camera (and my smartphone) along so not even this is necessary. You can even attach the sliding bracket to the camera in such a way that the battery compartment isn't blocked.

Once the setup is complete, you usually hike along with the scope on your shoulder and the camera setup folded up, so that you are quickly in the viewing mode. Then when you want to digiscope, you just release the catch, fold the camera back down, fix it with the lever, turn the camera on, zoom the camera if desired, refocus the scope if necessary, and shoot. I have found that the field of view after flipping the camera down is slightly higher than before, so I automatically move it down a few millimeters.

Theoretically you can even zoom the scope's eyepiece while the camera is in shooting mode, but you usually do this before flipping the camera down, if at all. I have found that with the eyepiece's lowest magnification (25x) together with the camera's zero to four times magnification I often have a subject too large for the field of view. I rarely use the scope's zoom any more. This setup has some vignetting if I don't zoom the camera, so I usually do. I hope my next setup doesn't have any vignetting.

The entire weight of the new system is 10 lb. (4.5 kg). The old system weighs 15 lb. (6.8 kg); that's 50% more. This is of course very noticeable if you carry your scope around with you everywhere you go birding, even while hiking for hours in the mountains.

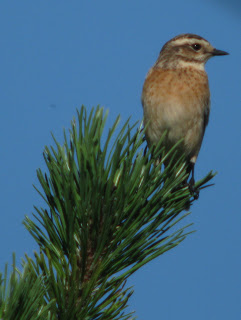
As to photos taken with this system, judge for yourself (click on the images for more and larger images):
2012-07-08 Ft Desota State Park, Florida (Nikon Coolpix AW100)
2012-07-10 Sun City Center, Florida (Nikon Coolpix AW100)
2012-07-17 Padre Island, Corpus Christi, Texas (Nikon Coolpix AW100)
2012-07-18 Padre Island, Corpus Christi, Texas (Nikon Coolpix AW100)
2012-07-31 Earlysville, Virginia (Canon PowerShot A590)
2012-08-18 Feuerkogel, Ebensee, Austria (Canon PowerShot A590)
2012-10-25 Heligoland, Germany (Canon PowerShot A590)
2012-10-26 Heligoland, Germany (Canon PowerShot A590)
2012-10-27 Heligoland, Germany (Canon PowerShot A590)


[Disclaimer: I am in no way connected to the Swarovski company (besides being their customer), nor are any relatives or close friends of mine employed by them. Only a few of my social media friends work for them. Nor have I received any payment from Swarovski, either monetarily or in products. The system described above was lent to me by Swarovski with the understanding that I would blog my experience with it.]

2012-06-18

Digiscoping with the ScopeTronix EZ-Pix Digital Camera Holder

Admittedly this is an old adapter; I bought it in 2004. ScopeTronix mentions the EZ-Pix II on their website, but I can't tell what's new about it because the links on the website don't work.

No matter. This is to discuss a different approach to digital camera adapters than the one I mentioned here: Digiscoping Test

The scope setup and camera are the same. The digital camera adapter is a ScopeTronix EZ-Pix.
Rather than using a cylinder that slips over your eyepiece and another cylinder that slips over the first and attaches to your camera via its filter thread, this system uses a padded clamp that attaches to your eyepiece, which is attached to a slotted bar, which in turn is attached to your camera's tripod mounting hole via a screw and optional spacer.
High compatibility are ensured by:

  • 2" and 1.25" clamps included
  • pivot post
  • slotted bar that slides backward and forward and pivots on the pivot post
  • camera attachment knob that slides up and down on the slotted bar
  • optional spacer
  • optional socket head bolt to use for more permanently fixing the adapter with heavier cameras
  • no looking for an adapter with the right size thread for your camera's filter thread or a camera that even has a filter thread (almost all cameras have a tripod mounting hole)
All these variables, however, make it a bit tricky getting the camera aligned to the eyepiece just right. Once it is, however, you "only" need to loosen the clamp, remove the assembly and replace it again when switching from viewing to digiscoping and back.

A further disadvantage if you're using a zoom eyepiece is that the entire adapter-camera assembly turns when you zoom in and out, making zooming impractical. In addition, the clamp covers the magnification markings on the eyepiece ("25x", "60x", etc.).

This adapter originally costed $49.95. I can't tell what the current model costs because, like I said, the links on the website don't work.

2012-06-02

Digiscoping Test

After getting my spotting scope repaired, I did a digiscoping test.

Here's my equipment:

  • Swarovski AT 80 spotting scope (13 years old)
  • Swarovski 20-60x eyepiece
  • Swarovski tripod
  • Foto Fennica SWA AT camera adapter with 27 mm adapter ring
  • Nikon CoolPix AW100 compact digital camera

The CoolPix AW100 is one of the only compact digital cameras I know of that has a filter adapter (40.5 mm). At first I tried connecting this to the SWA AT camera adapter with 2 filter adapter rings (that added a mm or 2 to the distance from camera to scope). I couldn't find an individual adapter ring that went from 27 to 40.5 mm. However, the vignetting was too pronounced.
In order to reduce vignetting by getting the camera lens as close as possible to the scope's eyepiece, I got my brother-in-law to screw the plastic AW100 filter adapter directly to the SWA AT camera adapter. This was achieved by boring threading for the screws used directly into the metal camera adapter.
In the photo below the Bullfinch was in the shade at a feeder in my yard. I used the 20x magnification of the zoom eyepiece and the maximum optical zoom of the camera (4x). The photo was not cropped. As one can see there is no vignetting when using the camera's optical zoom.
In the following photo the Bullfinch was at a different feeder in full sunlight. I was closer to the subject and couldn't use the full optical zoom because the bird would fill the frame too much. Notice the vignetting.
The following photo is the same as the one above except that much of the vignetting was cropped out. Here one can see individual feathers of this songbird and the black eye against the black background. Even using my scope I would not have noticed this level of detail. In the wild it is almost impossible to distinguish this bird's eye from its background. Click on the photo for a larger version.
With a little more practice I could probably make fairly good photos with this setup. However, if the bird wasn't relatively stationary at my feeder for several minutes, I'm not sure I could get set up quickly enough before the bird flew away. It takes some time to remove the rubber eye cup and affix the first half of the camera adapter to the scope eyepiece with the set screw. The other half of the camera adapter is clipped on quickly to the camera, but this is also its disadvantage: Due to its material (plastic) it sometimes comes off again too easily and might break easily.

Swarovski makes a similar camera adapter called the DCA that would fit my eyepiece. This may be more stable. However, I plan on trying a different setup altogether for the following reasons:

  • My scope isn't particularly suited to digiscoping since it's not HD.
  • My eyepiece isn't particularly suited to digiscoping since it's not wide-angle.
  • I think the digital camera base (DCB) by Swarovski would be more practical than the type of adapter I'm using, since it swings up and away for viewing and swings back quickly into place for taking photos, but the DCB doesn't fit my older model scope.
  • A different compact digital camera that allows one to do more settings manually might be more suitable.

So, except for the tripod, that means exchanging every part of my equipment. I might as well get a new tripod too, since they're lighter these days.

What are your experiences with digiscoping? Please comment below.

Chronology of a Customer Service Case

I bought my Swarovski spotting scope AT 80 and 20-60x eyepiece in 1999 (13 years ago). When birding in a group, I don't notice anyone any more with this older gray-colored model. Almost everyone has a Swarovski, but it's the newer green-colored, ATM/STM model.


I noticed that my scope had play in the focusing ring, that is, when I switch directions when turning it, there was about 1 or 2 mm play before it started turning in the other direction. In addition it seemed to me I couldn't focus sharply at the highest magnification of 60x.

At the Pannonian Bird Experience, I mentioned this to a Swarovski representative who took a look through my scope and suggested I send it in to be repaired. Since I live in Austria, I visited the Austrian Swarovski website and got the e-mail address of the Head of the Customer Service department.


I still have the guarantee card (with dealer's stamp and purchase date) and noticed that they have a 30-year guarantee (!) but any work done after 5 years is to be paid by the customer. It also says that parts subject to natural wear (eye cups, etc.) are not covered. I couldn't readily locate the original invoice.


I e-mailed them on April 30 attaching a scan of my guarantee card and asked what to do. The next day (May 1) I received an e-mail saying to send it in and they would send me a cost estimate.

A week later (May 8) I mailed the scope and eyepiece to Swarovski in Absam, Tirol, Austria. Two days later (May 10) I received an e-mail saying the repair would be free of charge(!), although the attached estimate showed that the cost would normally be about EUR 200 (US 250), mostly for work but also a few parts.

Not quite 2 weeks later (May 23) I received my repaired scope and eyepiece. There is no longer play in the focus ring, the optics were cleaned, and the rubber parts (e.g. eye cup) were replaced. The light intensity is much higher, and I am now able to focus sharply at 60x magnification.

I am extremely satisfied with the handling of this customer service case and can only recommend it to all other companies, most noticeably consumer electronics companies I have dealt with. Swarovski has gone far beyond their already very generous guarantee. The only costs I incurred were the shipping costs to the company. Sure, they're a little more expensive than other optics companies, but the quality of the products and of the customer service more than make up for the price difference in the long run.

[Disclaimer: I am in no way connected to the Swarovski company (besides being their customer), nor are any relatives or close friends of mine employed by them. Only a few of my social media friends work for them. Nor have I received any payment from Swarovski, either monetarily or in products. Nor did they know beforehand that I would do this blog post.]

Does anyone else have notable customer service experiences they would like to share?

Does anyone else have experience with Swarovski or other birding optics companies they would like to share?

Please comment below.

2012-05-27

Handy Bird-book Bookmarks

So, you're tracking down a confusing fall warbler or other difficult bird. You're taking looks through the bins and simultaneously consulting your favorite bird book. As you switch back and forth from book to binoculars, you awkwardly clamp the book, opened to the right page, under your arm or between your legs. You know from experience that traditional bookmarks made from pieces of paper don't work since they inevitably blow away in the wind. Besides, they block the view of text or pictures in the book.

Here's a handy tip: Get a piece of thin ribbon about three times as long as your book is tall. Fold it in half, and glue the folded part into the spine if it's a hardcover book or between the cover and first or last page near the spine if it's a softcover.

Then reap the praise of all your fellow birders as they notice what a great idea you had! If they remark that it looks like a bible, you can remark, "Well, it is my birding bible!"